Posts

Showing posts from June, 2016

Summer Photo Shoot

Image
Hey guys! Today's post is a bonus post because I did a photo shoot for you guys!And it is a bit different because I have never done a photo shoot on this blog before! But if you guys like these photo shoots definitely let me know! (If you are wondering where I took these pictures I took them in a lobby of a hotel.) I hope you guys enjoy this post! Have a great day and I'll see you all on Monday! I might be having another photo shoot soon,so look out for that! - BloggerGirl

DIY Summer Wall Calendar

Image
Hey guys! I'm so sorry I didn't post this yesterday I was just really busy and I didn't have time to post this! But I hope you will enjoy this craft! It is really easy to make and it keeps you organized during the summer. I chose to make the month July but you can make a wall calendar with the whole summer if you want to! So lets get started! Step 1: Gather your supplies: Coloring pencils, a stapler, a ruler, and paper. Step 2: Take your ruler, a pencil, and a paper, and make squares to mark each date. You can use a normal calendar to copy. Step 3: Then take your coloring pencils and color it in. Step 4:  Now your ready to hang on your wall or wall board. You can use tacks to hang it up or staple it. And your done! I hope you all enjoyed! Just a reminder last weeks post I mentioned I am having a Q & A so go on over and write a question on that post if you haven't already! Have a great day and I'll see you o...

DIY Jar Cup

Image
Hey guys! It's Monday! And today I'm going to show you how to make this very simple DIY Jar Cup! This is great for on the go or cookouts or anything! I love this DIY so much I have been using it all day! I really hope you guys like it! And stay till the end where I will have a special announcement! So lets get started! Step 1: Gather your supplies: A jar with a top, a screwdriver, and a straw. Step 2:  Take your cap and your screwdriver and make a hole in the top of your cap.   Step 3: Take your straw and push it through the top, so that it fits in perfectly. Step 4: Put your cap onto your jar. When your ready to pour a drink in take it off, pour it in, and put it back on. I put lemonade into mine! And your done! Hope you enjoyed! And that is how you make a DIY Jar Cup! I hope you all enjoyed this craft! And now for the announcement: For our celebration of 50 TH post I am going to be doing a Q and A! So please leave any questio...

DIY Fathers Day Gift

Image
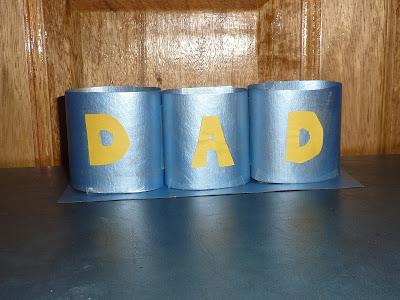
Hey guys! I know it isn't Monday but today's post is a special post because on Sunday it is Fathers Day! I just want to say Happy Fathers day to all the fathers! I posted a Mothers Day craft last month and I will put a link to that at the end of this post. Anyways, Fathers Day is almost here and I wanted to show you guys how to make this super cool gift that you can give to your dad on Fathers Day! I know I will be giving this to my dad! Let's get started!   Step 1: Gather your supplies: 1 piece of cardboard(I painted mine blue), double sided tape or regular tape, glue,a ruler, scissors, and a piece of yellow paper(or what ever color you chose). Step 2: Measure with your ruler and pencil, and cut out 4 strips. Each of my strips were about 4 inches long.   Step 3: Use 3 of your strips and put one to the side. Staple your strips how it is shown in the picture.  Step 4:  Then cut out letters out of your yellow paper that say: D A D ...

DIY Beach Bag

Image
Hey guys! It's Monday, and today I'm going to show you how to make your own beach bag! You don't have to use this bag to go to the beach with you can take it anywhere or just have it at home! I am so excited for summer let me know if your excited too! So lets get started!  Step 1: Gather your supplies: Colored paper(I chose black,dark blue,light blue,and yellow), glue stick, double sided tape (or regular tape), scissors, and a paper or fabric bag. Step 2:  Start off by cutting your yellow for the bottom of the bag to look like sand. Tape or glue it on.   Step 3:  Then add all of your different colored papers to make a scene. You can add more details like I added some birds in the sky. Step 4: And your done! You can give this as a gift to someone or use it yourself! I hope you enjoyed and let me know if you make this craft! This craft is simple and easy, and this summer you will have the cutest beach bag that you made yourself...

DIY Life Hacks

Image
Hey guys! It's Monday and today's post is.... DIY Life Hacks ! You guys really seemed to like the other life hacks I did last time so... I decided to show you guys some new ones that I did! These are all really simple and are very useful! Also a huge shout out to BloggerA  for getting the right answer on the summer scrapbook post ! I'm so excited to share these life hacks with you guys so, let's get started!  Life hack #1: When your baking cookies, use a ice cream scoop to mold your cookie dough into the perfect shape!  Life hack #2 : Don't you just hate it when your craft scissors are not sharp enough? Just take some aluminum foil and your scissors and cut it into little pieces. By doing this it will leave your scissors sharp, and ready to use!  Life hack #3:   Summer is just around the corner, and this time of year we have cookouts,picnics, and eat out side! And sometimes bugs get into our drinks! Just take a muffin paper, and...