Posts

Showing posts with the label DIY

DIY back to school Notebooks

Image
Hey readers! Welcome back! I do have another back to school post for you all as promised. I used to make tons of DIY projects back in the day but I haven't in a very long time. So please bear with me as I try to get back into the DIY world. But since I share a lot of things on here anyways I decided to show you guys this notebook that I redid. It's totally DIY-able and I'm going to tell you guys exactly how I did it.  I'm a big fan of easy DIYs and fast ones too. I tend to get a little impatient when it comes to painting though. So that was my first mistake in this process lol. I decided to scroll through Pinterest to find some inspiration before I started. I kind mixed from the ideas I saw and just kind of made up my own.  I started with the painting (ugh) and I went for a pink and green. I had envisioned it a little different in my head but it's okay.  While this was supposed to be drying I looked up some quotes that might motivate me in the school year...

Things To Do This Summer

Image
Hey readers! Welcome back :) Today I'm going to be giving you some ideas of things to do this Summer.  I personally love summertime because it usually clears my schedule up a bit. But sometimes when that happens, I'm at a loss of what to do with my time.  So that's why I'm here to help you out a bit with a list of things you can do this Summer 2019.  I have tried each and every one  of these things already so this is 100% approved by me. :) Go on a Road Trip ! I've already done this, this summer already. My family and I drove out of the city to a beach house with a pool and spent a week there. I would highly recommend road tripping with family, friends, or even by yourself. Go to the beach (or lake). Depending on where you live in the world (because I have a wide variety of people from different countries that read this blog), I think it's important to go to a body of water this summer. It could be a beach, a lake, a pond, or even a pool if...

Winter DIYs and Tips

Image
  Hey everyone! Welcome back to DIY Crafts + Life Style! :) I'm super excited for todays post because I think it turned out pretty well. As you know it is winter in most parts of the world including where I live. It isn't very cold where I am, so I'm not gonna lie, I was wearing a sweater for this post but I also had a fan blowing on me lol. Also just a little intro on what today's post is about, I am basically sharing some tips and DIYs that might help you out this winter. With that being said, I hope you guys enjoy today's post and maybe get something out of it. Let's get started! Tip 1: Just an easy way to stay organized this holiday season is to plan everything out! It actually helps me out a ton! If you are buying gifts for people and need to write things down, this is a perfect place to put it, in your planner. :) Tip 2: Relax! This winter season is full of excitement and STRESS! So my tip for you guys who feel overworked, and stress...

DIY Summer Decor

Image
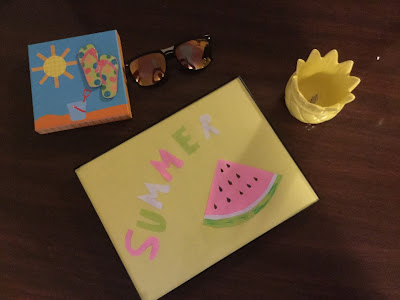
Hey everyone! It's Monday! And for today's post I will be showing you how to make this super cute and simple Summer Framed Decor !! So let's get started!  Step 1: Gather your supplies: A frame (with glass and and a backing), yellow, green, pink and white paper, a black pen, and scissors.   Step 2: So for today, we are going to be making a piece of watermelon to go in the frame. So in the picture above, you can see three shapes for making the watermelon, cut those out with your scissors.  Step 3: Taking your pen, draw some black seeds onto your large pink part of the watermelon slice.   Step 4: Then glue the white and green parts onto the pink.(As shown in the picture above) Let it dry before moving onto the next step.  Step 5: You're going to need your colored paper for this step. Cut out the word "Summer" using your 3 different colors. Then place a piece of yellow paper to be the background. Frame this.     ...

DIY DONUT CD

Image
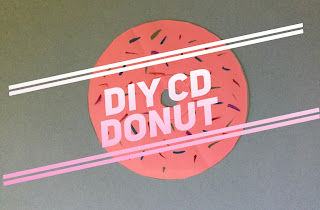
Hey everyone! It's Monday!! And I'm so sorry I haven't posted in 2 weeks but I really needed a break from blogging since I have been so busy with moving. But for today's post I wanted to diy an old clear CD and make it a cut diy donut for decoration! I really like how it turned out and I would definitely make this again. Let me know in the comments if you have any suggestions for any future posts and I'll try to make it happen. So let's get started! Step 1: To start you are going to need to gather your supplies. You will need, a clear CD, a sheet of colored paper (your choice,I went with pink), markers,scissors, and glue. Step 2: Start by tracing the size of your CD onto your paper. Then using your scissors cut out your perfect circle with a small whole in the middle. Step 3: Using your markers make sprinkles on your circle. Make sure to not make to many or it will cover up your whole donut. Step 4: You are going to need a tissue for th...

DIY Mothers Day Card

Image
Hey everyone! Today is a bonus post because I wanted to get this up before Monday. Since Mothers Day is on Sunday I thought that I would post a DIY so that you can make it in time for Sunday. But I still will be posting on Monday so look out for that too! :) I also made a Mothers Day DIY last year which I will leave the link to at the end of this post. So lets get started! Step 1: Gather your supplies: 3 different colors of paper, a colorful design (or use the front of an old card like I did), glue, and scissors. Step 2: Fold your first piece of paper in half. DO NOT CUT IT. Step 3: Cut out two triangles with your scissors. Make sure to use two different colors of paper. Step 4: Glue your two pieces of paper on your first paper. (See in picture) Step 5: Glue your top piece on top. Then let it dry. Now you can write inside a note to your mom! <3 And that is the DIY!! <3 I hope you try it out! And if you make this let me know in the comments b...

DIY Donut Earphone Holder

Image
To start off this post I would just like to say....THIS IS MY 100th POST!! I am so happy and excited to be able to make my 100th post. Last week I forgot that my 100th post was coming up. I wanted to do something special for this post and make it super exciting. But then I decided I would go back to when I started this blog. So I went back to my roots and made a craft. But this time I didn't make this craft by myself! Two of my friends came over and helped me out. Thanks to Emma and Emmy for helping me out with my 100th post on DIY Crafts + Life Style you have made this day really special! :) This DIY is cute and helps you organize your earphones. Earphones always get tangled and I can never find then so this DIY helps with both of those things. Let me know in the comments if your gonna try this out!! <3 Lets get started! Step 1: Gather your supplies: A piece of cardboard, paint, a paint brush, and a X-acto knife.(you will also need two different sized container tops...

DIY Mosaic Table

Image
Hey everyone! Today's Monday! And for today's post I am going to be showing you how to make this awesome Mosaic Table! I had a lot of fun making it so I thought you guys would want to know how to make it too! :) Let me know what you think about my table in the comments! So lets get started! Step 1: Gather your supplies: An old table (wood preferably), strong glue , 4 pieces of wood (to make our border), a clamp (optional, but recommended) , tiles (color and design of your choice), white cement,   and white paint.  Step 2: Start by gluing your border down. Take your four pieces of wood and glue them on the sides. Using a clamp or something heavy, apply pressure to your wood so that it drys and stays on. You are also going to want to sand your wood if not already sanded. Step 3: Paint a light coat of paint around your border but leave the rest of your table to paint for later. Break up your tiles into smaller pieces and start gluing them into a patter...

DIY Candle Holder

Image
Hey everyone! Today I will be sharing with you this super cool DIY GLITTER CANDLE HOLDER! It is super cute and I am obsessed! Just the other day I realized that I haven't posted a Craft on here in a while so I thought I would try to post more DIYs. Let me know in the comments if you have any ideas of what crafts you would like to see on here. Also I'm sorry this is a day late, I was going to post this yesterday(Monday) but I didn't have time.  I can't wait to show you how to make this craft so...Let's get started!!  Step 1: Gather your supplies: A glass jar(I used a Nutella jar), a small candle, a paint brush, glitter,tape,and glue. First take your tape and cut out a shape of your choice. Then stick it to the INSIDE of your jar.  Then using your paintbrush spread the glue all over the inside of the jar. Take your glitter and pour some into the jar. Shake the jar up.(You make need to place the top on). Dump the excess glitter. Let your ...