Posts

Showing posts from September, 2015
Image
Hey! I'm back! I decided to do something super simple that it takes no time at all!  I am going to simply decorate a small white teacup! I hope you will try this too! :)

Cute Organizer

Image
Hey Everyone! I'm back with a new craft for you! This was suggested by +STSE agf. She also has a blog! Here's the link so that you can check it out!  http://guitarplayers4.blogspot.sn/ Let's get started!  What you will need: A thin piece of cardboard (I am using a golden colored one), some thing to cut your cardboard with, tape (optional I did not use it), a stapler, a ruler, and a pencil. Step 1: Measure out your rectangles then cut. Step 2: Staple the edges so it makes a box shape. Step 3: Glue a labile onto your organizer. And there you have simple organizer or pencil holder! Thanks so much and I see you all on Monday!!! 

DIY after school fruit snacks

Image
Hey guys its Tuesday sorry I didn't post this on Monday!  I have a new post for you!  Here are some easy DIY snack idea's! They all have fruit involved. They are just simple snacks that you can have after a busy day or any time! :)  1) Yogurt fruit snack. (this one is very simple) To make this snack you will need yogurt and fruit of your choice. Pour your yogurt into a jar and put your toppings on top! I am a fan of oranges so I put that as my topping! And there you have a easy snack you can take any were! Just put on the top and your ready to go! 2) Apple sandwiches (sorry there are only 2 sandwiches on the plate becuz I ate the rest lol)  You will need a apple, peanut butter, chocolate chips. Cut the core out of your apple. peal it then slice it. Butter your apple slices with peanut butter. Sprinkle your chocolate chips onto your  peanut butter slices. Take one of your apple slices that does not have peanut butter on it and place it on top of your appl

Summer time party decorations

Image
Summer is almost over but its not over yet and those of you who are having summer party's then  here are a few decorations that you can make your self and everyone will love them! These decorations don't have to be for your party but can also go in your room!  The first decoration is a cute poster board!   What you will need: Two pieces of thick cardboard cut the same size. A glue stick and a bottle of glue. Cut out hearts and little circles. (if you see in the picture I painted one of my card boards red with a golden frame)  Step 1: Take your glue stick and glue the bottom of each heart and circle. Design it the way you want it to look. Step 2: Glue your other cardboard. And place your painted board on top. Step 3: Stick your thumb nails in! And there you have a cute poster board for your party! Here is the next decoration!  What you will need: Markers of your choice. A piece of paper. And a stapler. Step 1: Cut your piece of paper into a perf

Marker Holder

Image
This marker holder is very simple and takes no time at all!  What you will need:  A jar, a paint brush, your choice of paint, and tape. Step 1: Tape your design of what you want on your jar. I did zig-zag design. Step 2: Paint your whole jar the color you have chosen. Then peal off the tape. Place your markers into your jar. And there you have a cool jar to put your markers and sharpies! 

DIY Notebooks Part 3

Image
 What you will need: A sheet of contact paper a glue stick, a notebook, and a large index card. Step 1: Glue the front of the index card. Step 2: Then place it in the center of your notebook.  Step 3: Stick your piece of contact paper onto your notebook. Cut off the edges. Now you have a cool dry erase board notebook!

DIY notebooks part 2

Image
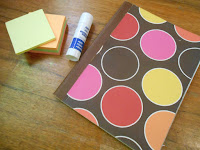
What you will need:  Sticky notes. (two different colors) A glue stick and a old note pad.  Step 1: Glue your first sticky note onto the top corner of your notebook. Step 2: Add your next color and go down going yellow,orange, yellow,orange. (These are the colors of my choice you can use which ever colors you wish.) Step 3: Do that until your whole notebook is covered. Step 4: Cover your notebook in contact paper so that it protects your note book from being written on.

DIY Notebooks part 1

Image
Hey Guys! Since its almost time to go back to school I decided to make some DIY notebooks that you can try! Here is part 1! Step 1:                                                                                                                      Draw with the markers of your choice (I am using orange and pink) a four letter word in bubble letters onto a index card turned over.                                     Step 2: Color in the rest of the index card. Step 3: Glue the front part of the index card that doesn't have the coloring on it.  Then turn it over and place in the center of your notebook. Step 4: Make a little paper frame that fits over your center piece.  Cut out two little hearts and put one at the top and one at the bottom.